Depending on your needs, answers to how to compress an image are various. You can turn to a dedicated image compressor, a native image viewer, or Microsoft Office programs on your device. Read this article to learn 4 ways to compress images efficiently.
How to Compress an Image with SwifDoo Image Compressor
The easiest way to compress image files might be to use a lightweight image compression tool. SwifDoo PDF is a multipurpose software program packed with an image compressor, PDF compressor, Word compressor, and more tools. It can compress an image in JPG, PNG, BMP, or another common format without losing quality. A big advantage of this application is the capability of compressing multiple images in bulk.
Here is how to compress an image with the SwifDoo image compressor.
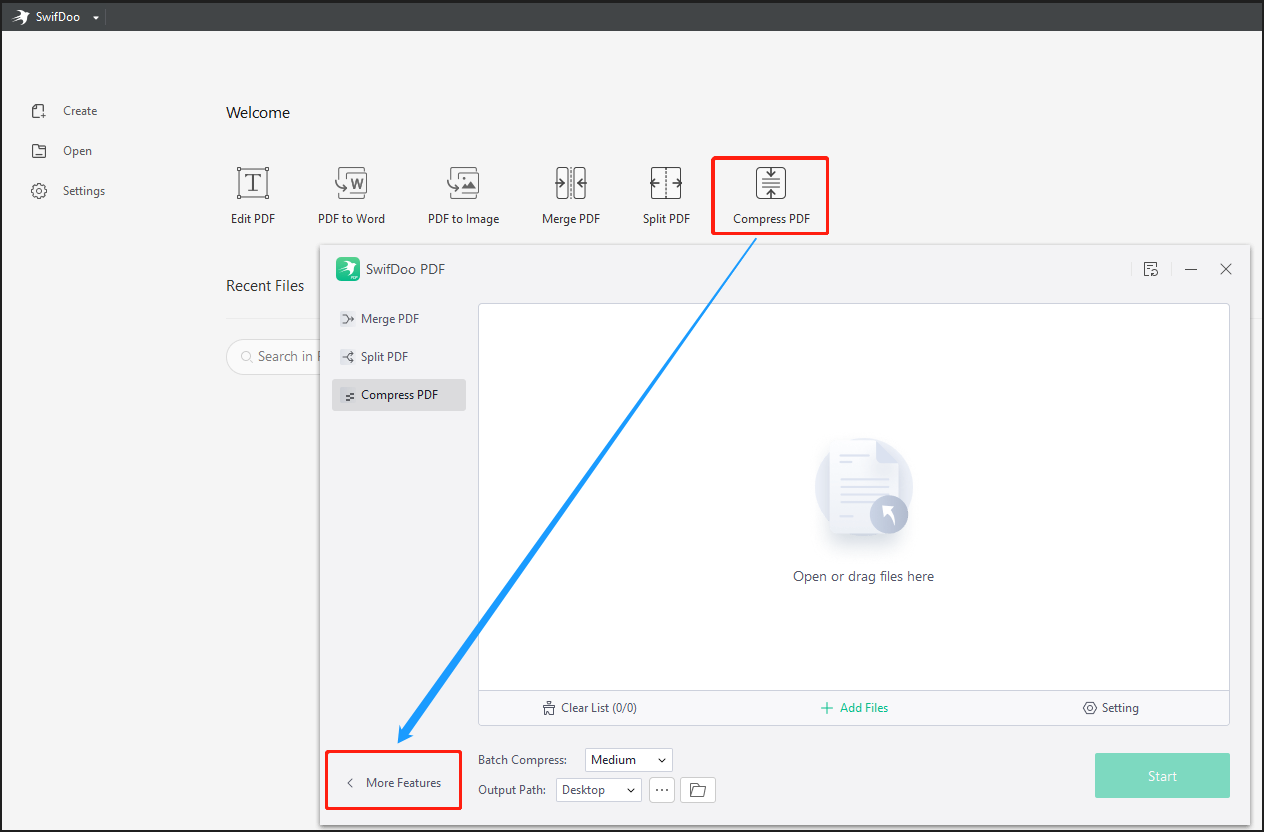
Step 1: Download and launch the image compressor for free on Windows. Click Compress PDF in the start interface, and tap More Features in the pop-up window;
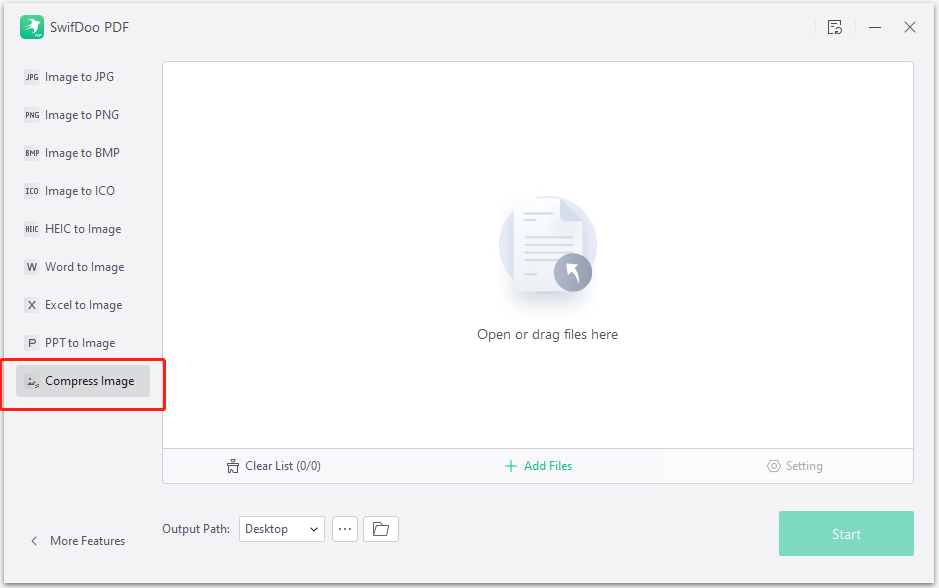
Step 2: Choose Image Converter in the toolbox panel, then select the Compress Image tool in the new dialogue box;
Step 3: Add your image to the compressor, choose the output location, and tap Start to compress the image to a smaller size.
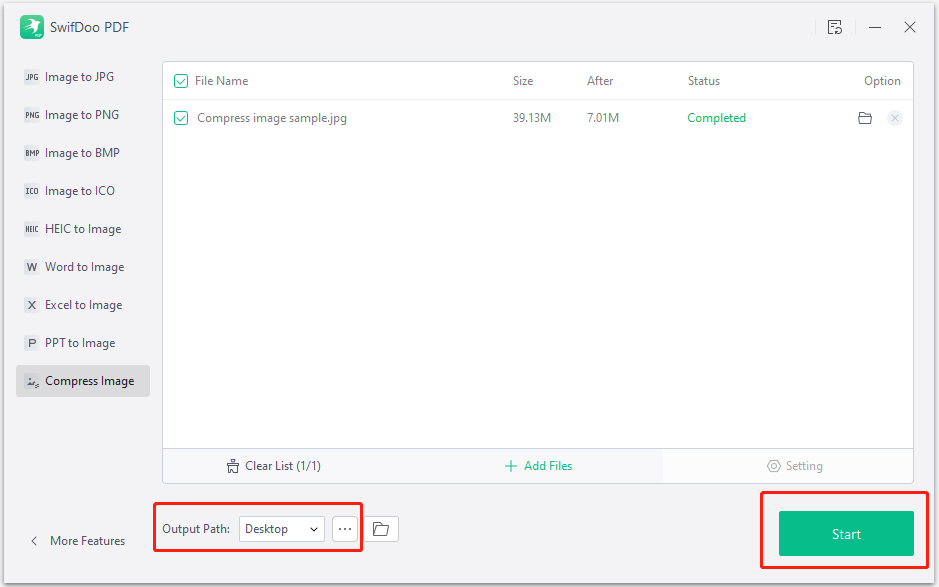
With the SwifDoo image size reducer, it takes just seconds to compress an image. This compression program is the go-to solution for compressing large images. The compressed image size will display on the right side of the original size. SwifDoo PDF can lower the image size by more than 80% without reducing the resolution.
In addition to tackling how to compress an image to make the picture smaller, SwifDoo PDF has almost everything else you may need in your daily document management. If needed, it enables you to combine your images into a PDF to make them smaller to share. You can edit, merge, split, and organize PDF files with the program’s help. Whether you want to convert PDFs to images, or many other formats, or vice versa, this software is at your service.
How to Compress an Image with the Photos App
If you are wondering how to compress an image without third-party applications, the Photos app on Windows gives the answer. The app comes as a built-in image viewer and editor on Windows devices. It can crop, mark up, and resize images. To compress an image with Photos, follow the below steps.
Step 1: Right-click on a photo to choose Open with and pick the Photos app to open it;
Step 2: Tap the See more icon shown as three dots on the top to select the Resize image option;
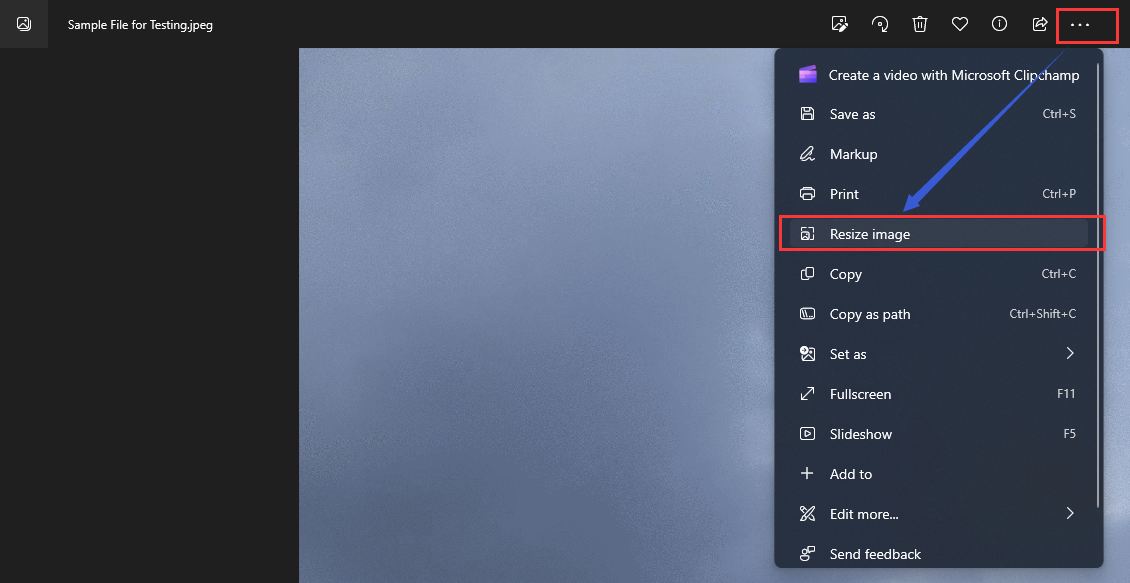
Step 3: Choose a preset image size best for emails or profile pictures, or click Define custom dimensions to customize the size, and save the resized copy as the compressed image.
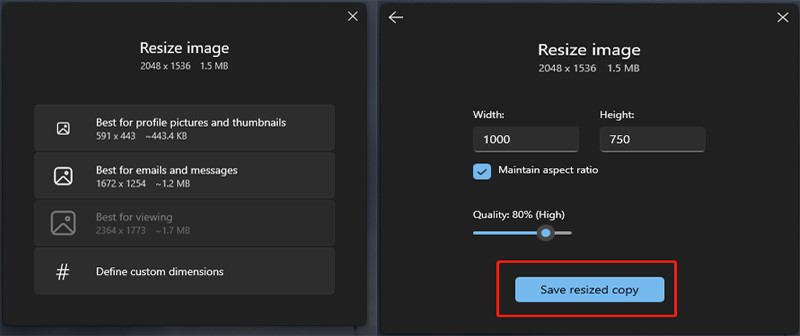
This method lowers image resolution to compress an image. It is a manual method suitable for processing only a few images. If you attempt to batch compress images, turn to the above-mentioned image compression software.
How to Compress an Image with Preview
To figure out how to compress an image on a Mac, take a look at the pre-installed image and PDF viewer, Preview. The program has a cool feature for resizing images. It offers multiple preset sizes for the compressed image and allows for custom image sizes. Moreover, you can take advantage of the app to convert, split, and combine PDF files. Go through the following guide to find how to compress an image or multiple images to reduce the image size.
Step 1: Select all the pictures you want to make smaller, and control-click on them to select Open with > Preview from the context menu;

Step 2: Click on an image and press Command + A to make all the opened images selected, and go to Tools to choose the Adjust Size option;
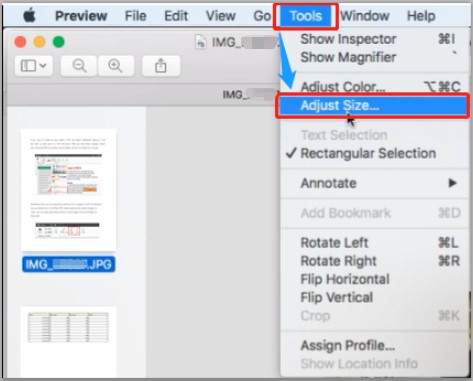
Step 3: Pick a standard image size or change the photo dimension manually, check the image size before and after compression, and hit OK to shrink the image size.
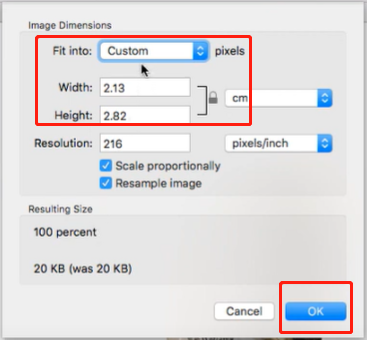
With Preview, you are able to compress an image or lots of images without installing any apps on Mac. When it’s finished, save the changes and quit the application by navigating to “Preview” > “Quit Preview”.
How to Compress Images in Microsoft PowerPoint or Word
Microsoft Office suite users have a free image compressor. Both MS PowerPoint and Word have the feature to compress image size to meet specific use. They allow you to compress an image or all the images in a Word document at once. After compression, you can re-save the images in smaller sizes. If you don’t mind lowering image resolution, this method is very useful. The process of compressing an image or many images with these programs is simple. Check how to do that from the below steps.
Step 1: Insert your images into MS PowerPoint or Word and select them;
Step 2: Click Compress Pictures under the Format tab;

Step 3: Choose your desired image resolution and tap OK. Then re-save the compressed images.
If your pictures already have a low resolution, this method may not be very useful. You’d better to turn to an image compressor like SwifDoo to compress your images without a hassle.
Final Thoughts
Large images take up much space and may cause issues when you send them to others. To avoid the hassles, it’s necessary to master how to compress an image.
Among all these tools and solutions introduced, which is the best way to compress images? If you want more control over your compressed images’ quality, SwifDoo image compressor is recommended. It allows you to reduce the image size without losing quality and supports mass compression. For new users, there is a 7-day free trial for you to do the work at no cost. Get it to make your picture smaller effortlessly now.
Frequently Asked Questions
What does it mean to compress an image?
Compressing images means decreasing the image size in bytes without downgrading much image quality. When it comes to how to compress an image, it refers to how to make the MB of a picture smaller, or how to make a picture in less megabytes. Different from cropping images, it is to change the data form to reduce the storage amount.


